How to do realistic physics simulation using Blender
If you don’t have experience, or are beginner you are in the right place to learn how to do realistic physics simulation on your computer.
1. Software
The first step to make a realistic physics simulation is choosen a software. There is a lot of good softwares. Here are some good ones:
Autodesk Fusion 360 - Good for engineering simulations;
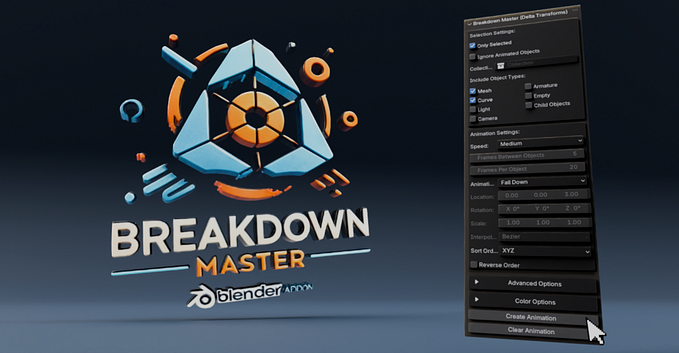
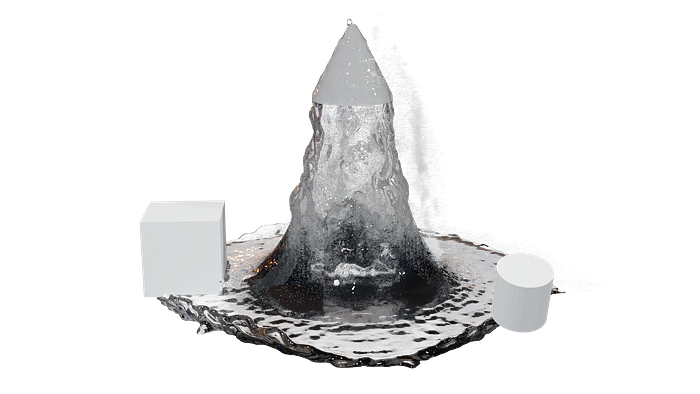
Blender - Free 3D software that is possible to do realistic physics simulations, it is good using fluids, fire, explosion, smoke, rigid bodies, soft bodies, cloths and has many addons that allow you to do more things and even destruction;
Cantera - Chemistry (open source);
Celestia - Astronomy simulations (open source);
There is a lot of simulations Softwares with different usages. If you are looking for some one that doesn’t is in this list just search on Google and you will find a good one for you.
2. Blender Basics
The software that I choose is Blender, a very good one.
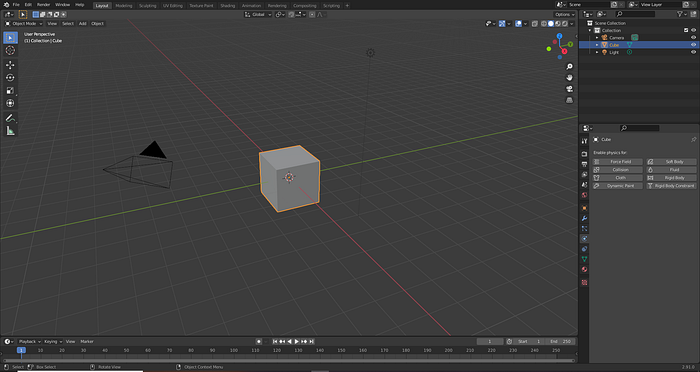
Viewpoint controll
Rotate (orbit)- Mouse wheel (middle button) and move the mouse
Zoom - Scroll. Or if you want a smooth zoom: Ctrl + scroll
Pan - Shift + Mouse wheel (middle button)
If you loose focus of the object simply select the object and press the ‘numpad .’
Scale object
To scale something in your scene, just click on it and press the ‘S’ key
If do you want to scale just one axis, pres the letter of the axis, for example, if you want to scale the object vertically, press ‘S’ and then ‘Z’
Move object
To move the object just press ‘G’, and use the same mechanics that scale uses to move on just one axis.
Add new object to the scene
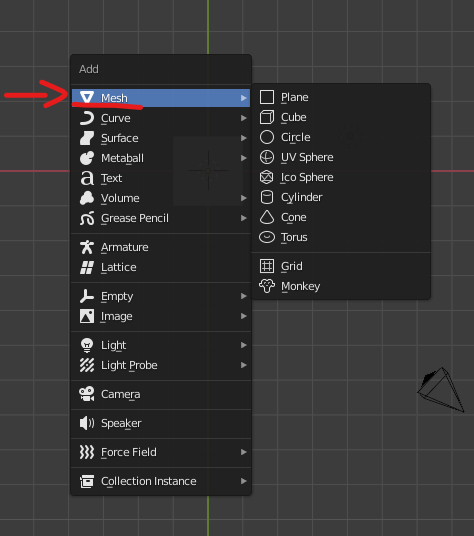
To add a new object just press ‘Shift + a’, and the basic objects will be in the ‘Mesh’ section.
2D ortographic views of the scene
If you want 2D views of the scene to correct or sculpt better, here are someA views:
Numpad 1 - Front Ortographic
Numpad 3 - Right Ortographic
Numpad 7 - Top Ortographic
And here are where find these ortographic views


3. Simulation
Fluid Simulation
One of the most incredible simulations in Blender are the fluid simulation.
If you want more fascinating results try searching for the Flip Fluid Blender addon, but in this article I will make the simulation without addons.
Fitst, add a mesh to the scene to be the fluid domain.

Then scale it
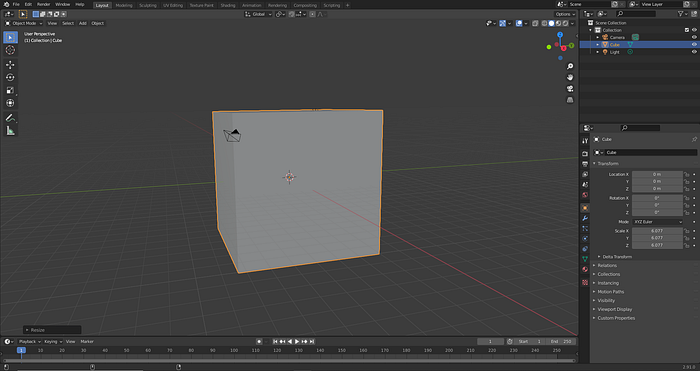
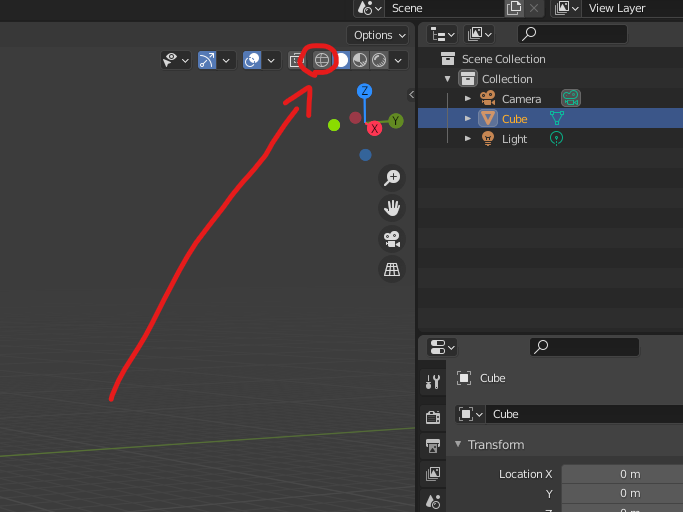
Enable wireframe vision
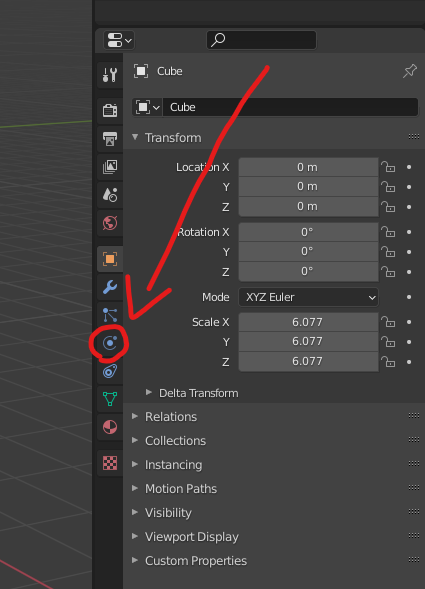
Now go to the Physics Properties
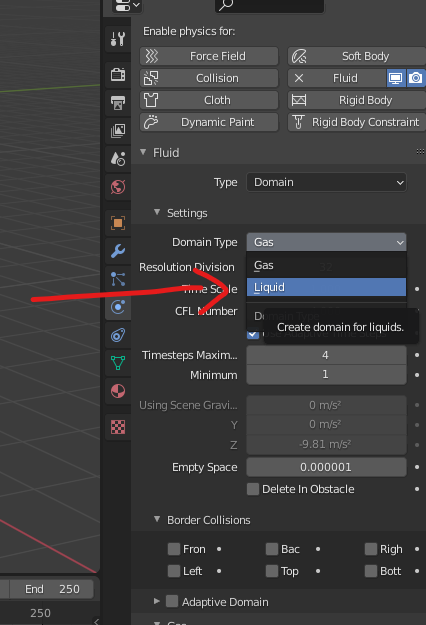
Click on fluid and then change the type to domain
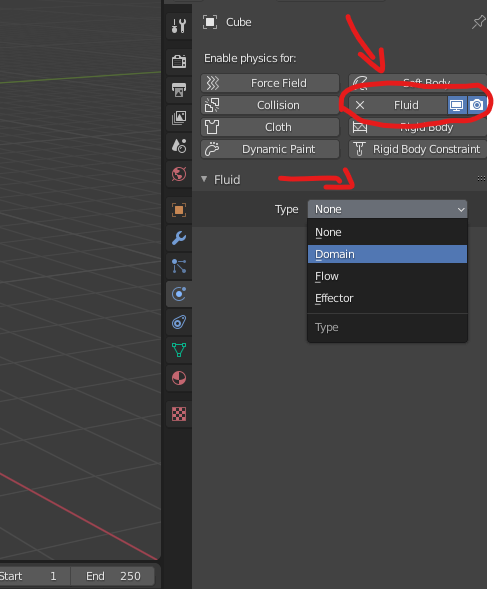
Change domain type to liquid
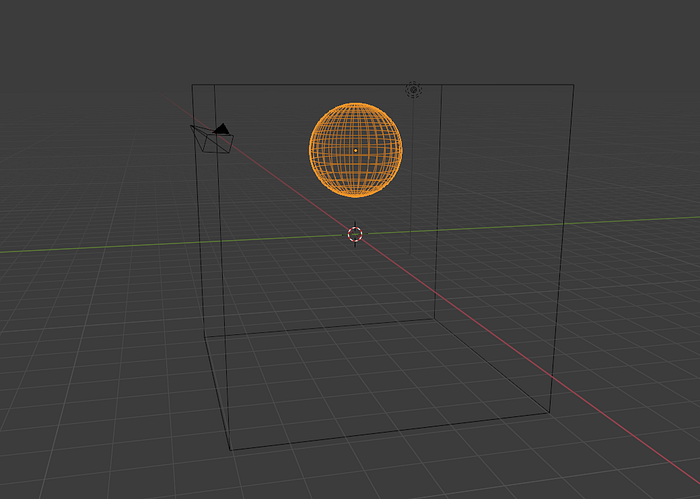
Now add a ‘UV Sphere’ to the scene, change the sphere position in axis ‘Z’ and upscale it a little
In Physics Properties in the sphere enable ‘Fluid’ and change type to ‘Flow’
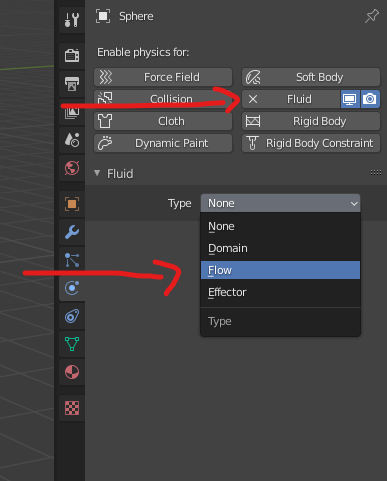
Change ‘Flow Type’ to ‘Liquid’

If you click in resume in the timeline you will see the animation, but it is no the final version

Now back to the cube and go to cache in ‘Fluid’ in the ‘Physics Properties’ and change ‘Replay’ to ‘Modular
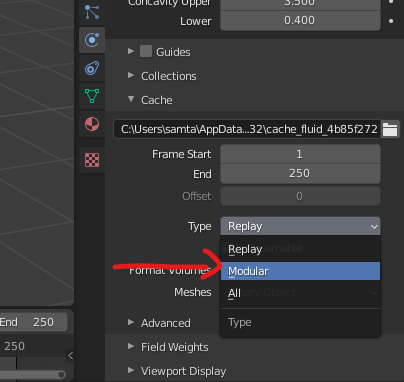
Now click in ‘Bake Data’

After done, now you can resume the animation and see the water as particles
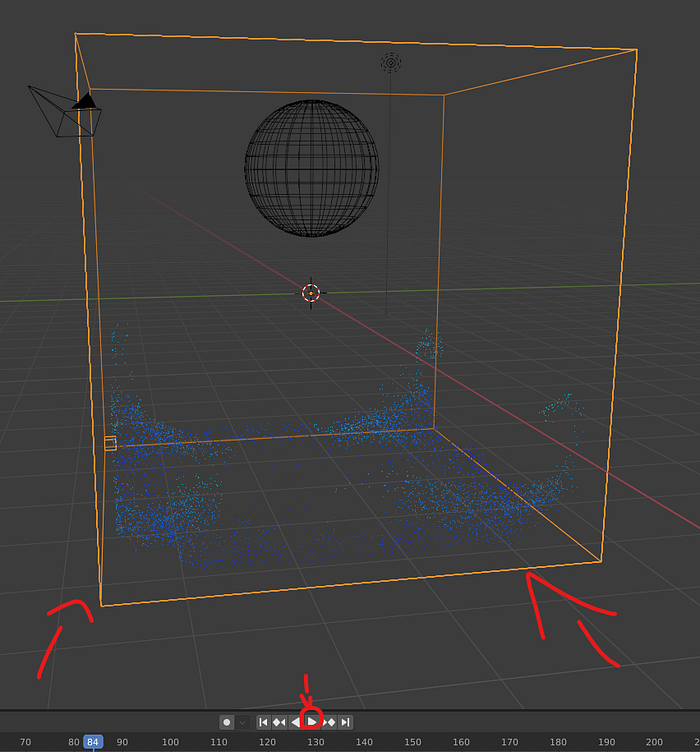
Let’s add some obstacles to this simulation.
Add a cone and don’t change the cone position
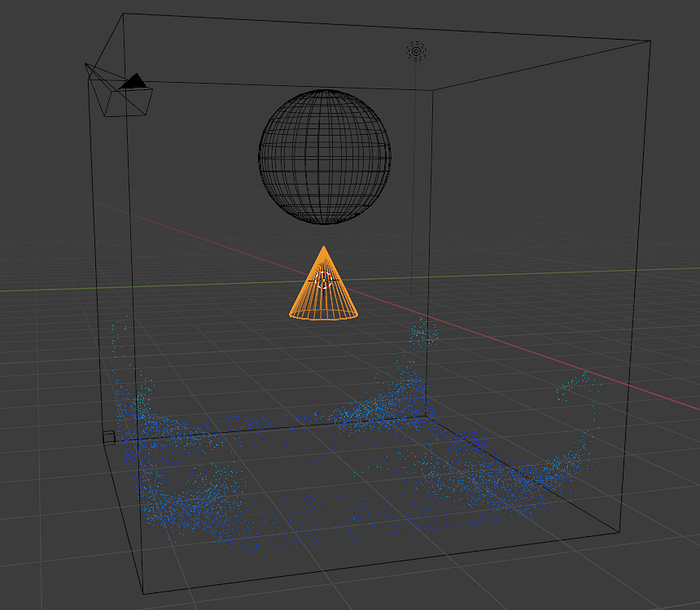
In ‘Physic Properties’ in the cone enable ‘Fluid’, but in this time set the type to ‘Effector’

And now add more obstacles and do the same that you did with the cone
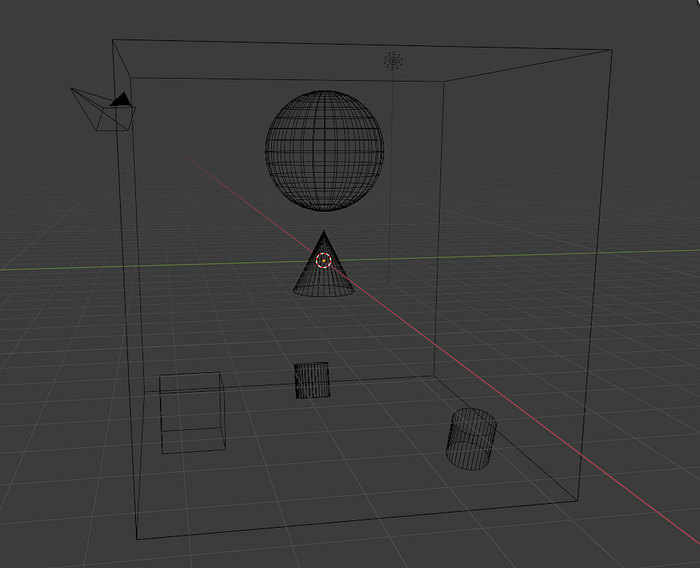
Now go to the cube domain and click in ‘Free Data’
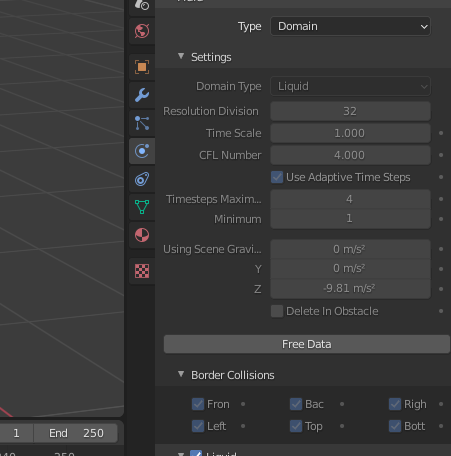
Then click again in ‘Bake Data’
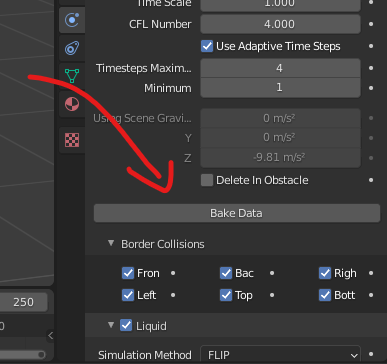
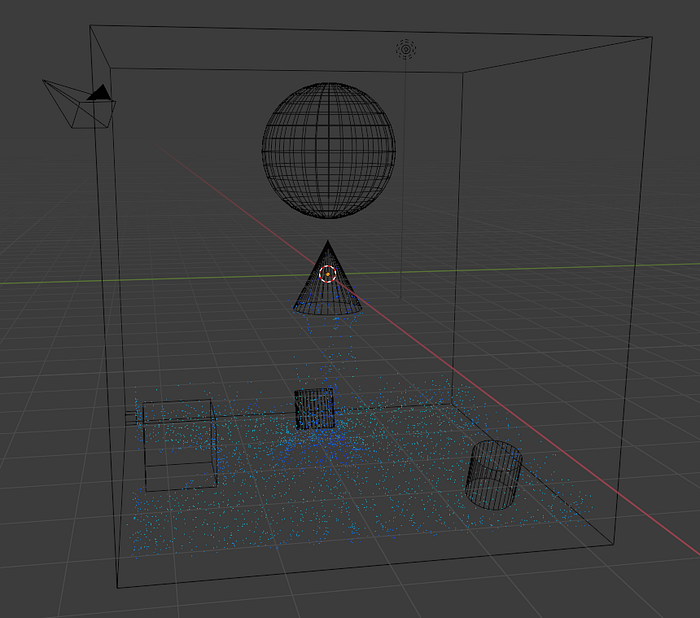
After making the Fluid Bake you can now resume the simulation and see the interaction of the fluid with the obstacles
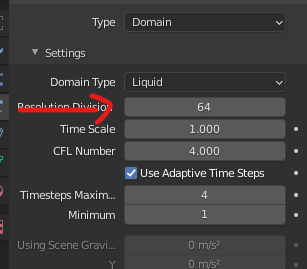
Now change your ‘Resolution Division’ to 64
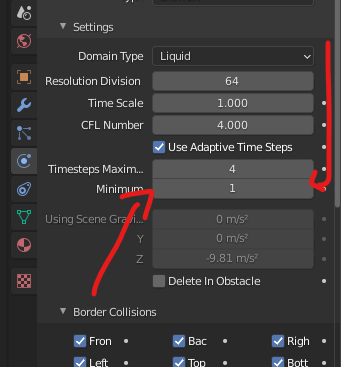
Change ‘Timesteps Minimum’ to at least 2
Enable ‘Difusion’

Choose what fluid do you prefer
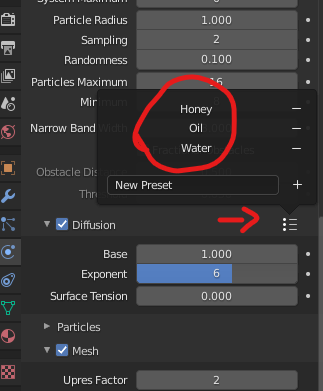
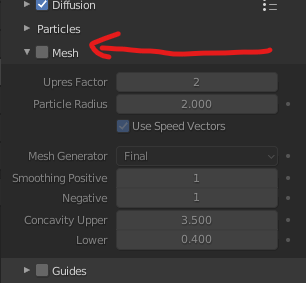
Now enable ‘Mesh’
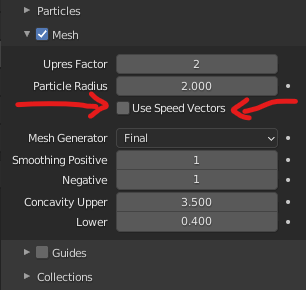
Enable ‘Use velocity vectors’ to blur the fluid during movement
Now change cache ‘Modular’ to ‘All’
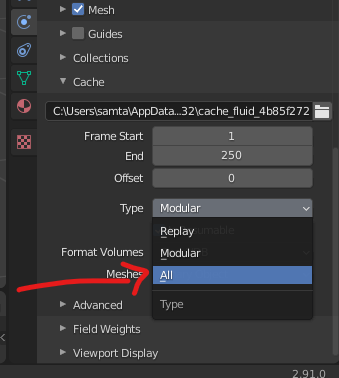
And click in ‘Bake All’, but now the baking process will take more time
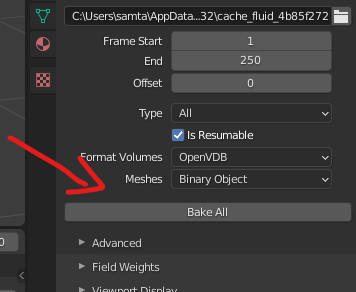
Let’s move to the last stage, the particles, but don’t forget to ‘Free’ in cache
Now, to make the fluid more realistic, go to the ‘Particles’ section and enable all 3 options available. If you want more details and more particles, change the ‘Upres Factor’ to 2
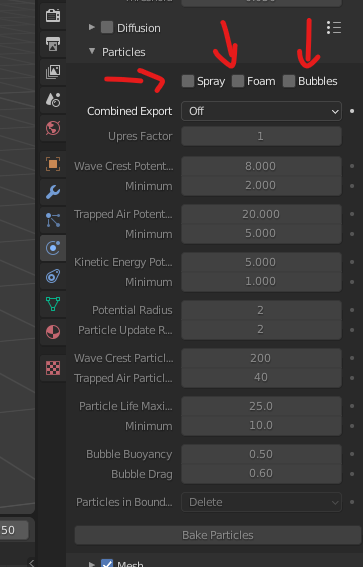
Now change the ‘Resolution Division’ to 128 (if you have a very good computer, you can change the ‘Resolution Division’ to 200 or 256, or even more, but 256 is already a good result)
I recommend you to create a folder for this project before Bake Alland save your project file inside this folder


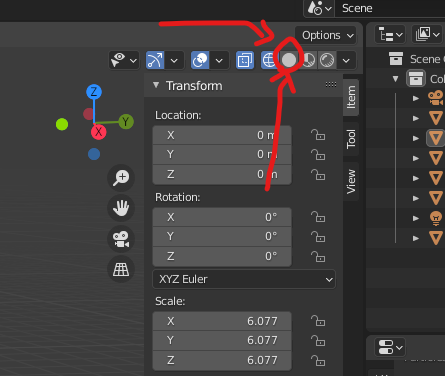
After baking all, you can now back to the solid material view
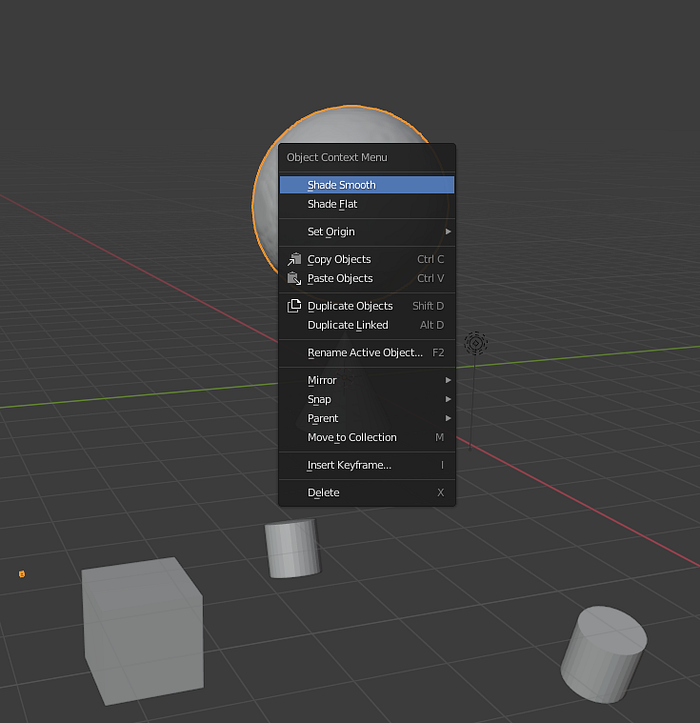
Now right click in the domain and click in ‘Shade Smooth’
Now with the ‘cube’ domain selected go to ‘Material Properties’
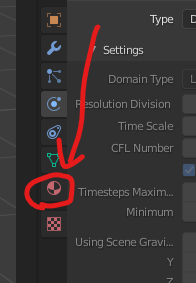
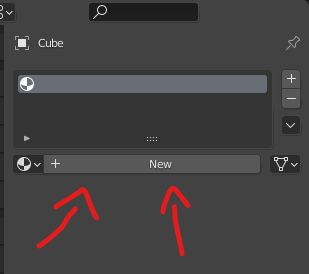
If you don’t have a material create a new one
Now go to the ‘Shading’ tab

Delete the material that you created, but don’t delete the ‘Material Output’
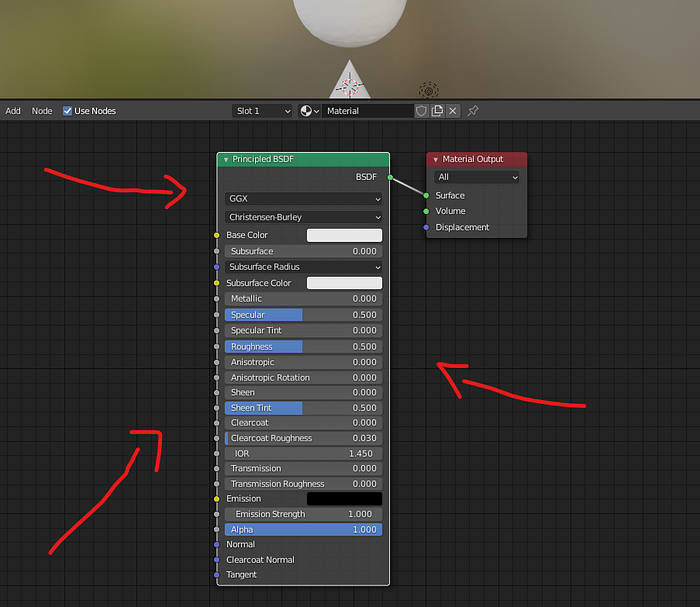
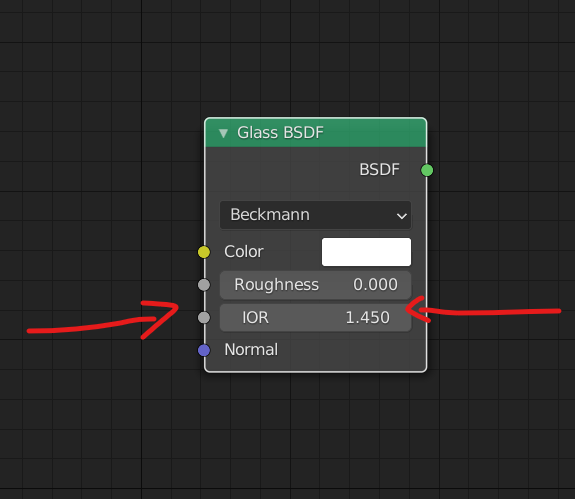
Now ‘Shift + A’ and add a new shader, the ‘Gass BSDF’
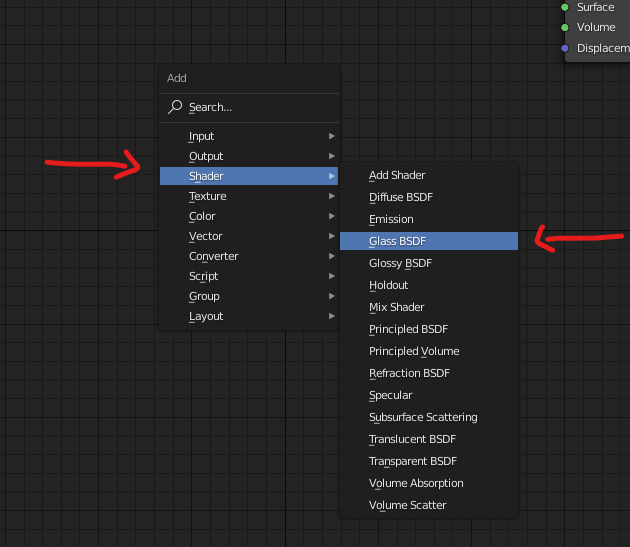
Change the IOR to 1.333
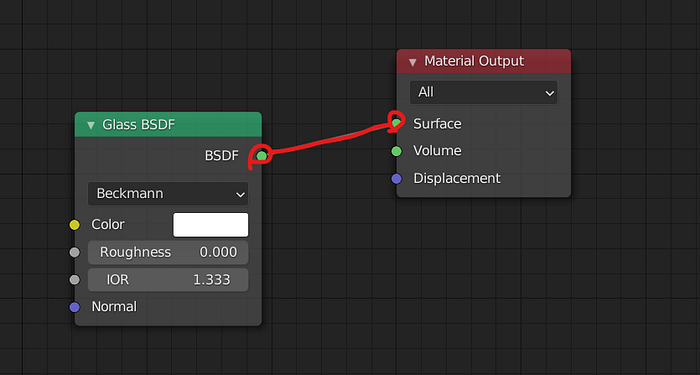
And connect the ‘Glass BSDF’ BSDF to ‘Surface’ in ‘Material Output’
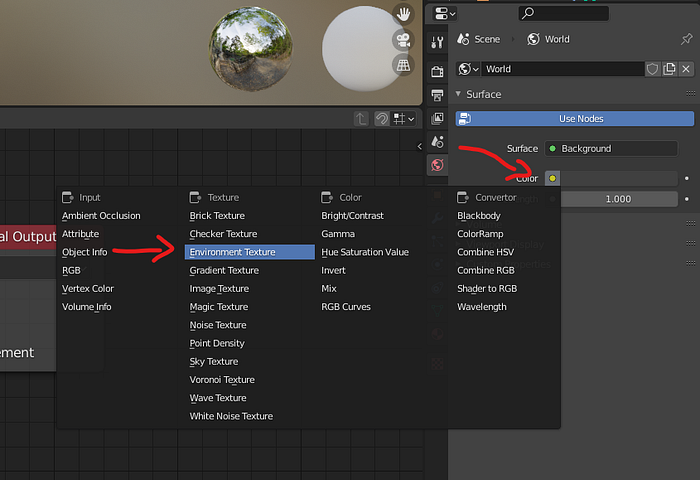
Now in ‘World’ inside ‘Surface’ click in color yellow circle and then choose ‘Enviroment Texture’
Now download an HDRI, depending on which HDRI you choose the color of the water will be different, I recommend downloading this in 4K, and if you have a slow computer download the 2K:
Create a folder inside your project called HDRIs and save the HDRI you downloaded inside this folder

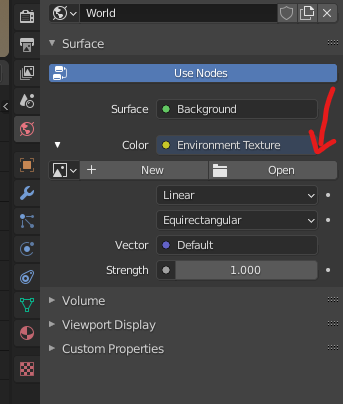
Now open this HDRI image as your ‘Enviroment Texture’
Now you can back to ‘Layout’
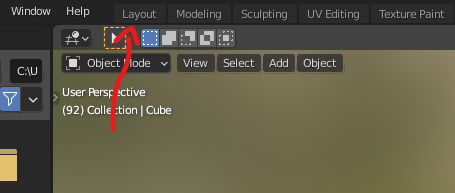
Go to ‘Render Properties’
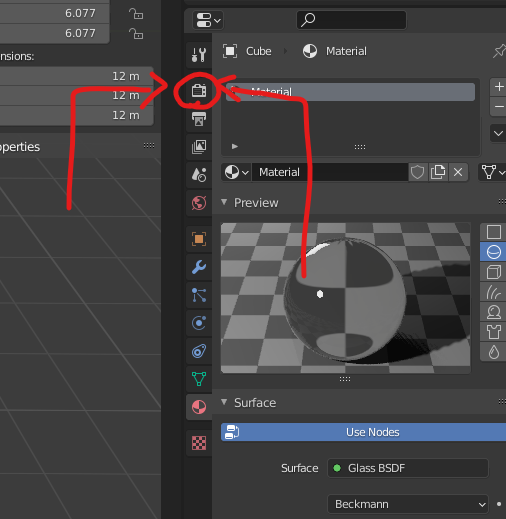
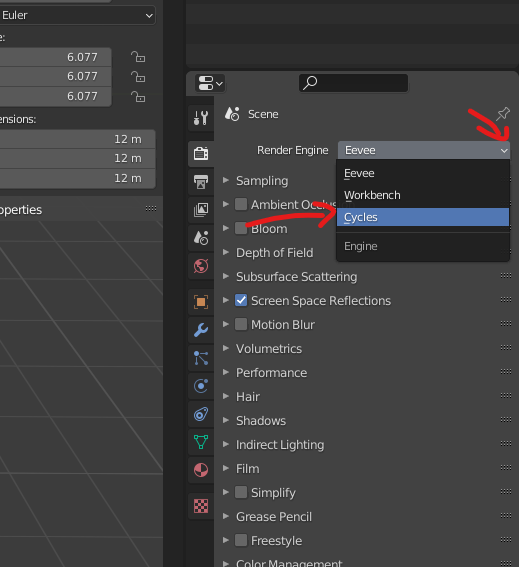
And change your ‘Render Engine’ to Cycles
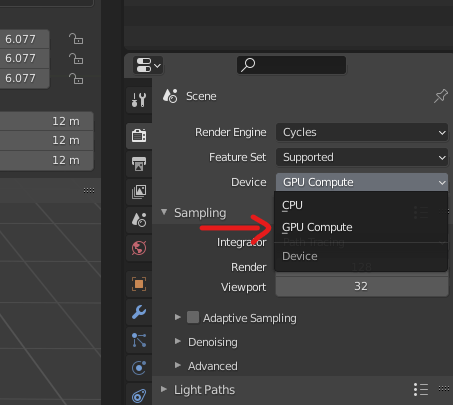
I recommend you to change your decive to GPU
Now click on this button to see the preview of the render in real time


In ‘Film’ enable ‘Transparent’ and enable ‘Transparent Glass’
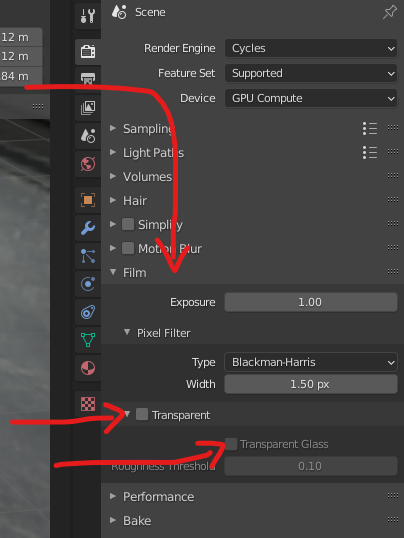
Now we’re going to render the particles, so back to solid view

‘Shif + Right Click’ to change the 3D cursor

Add an ico sphere
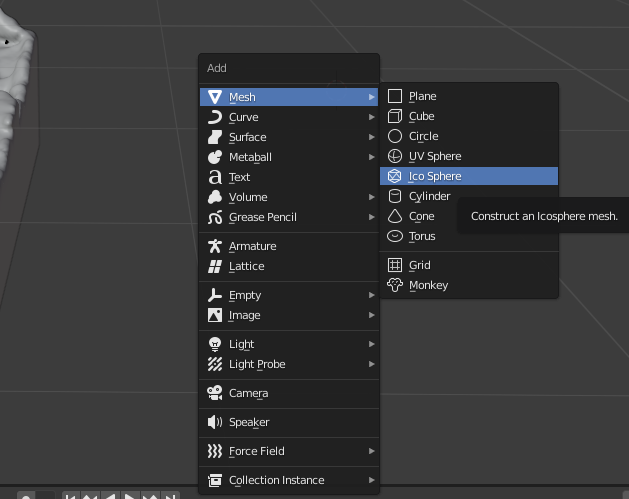
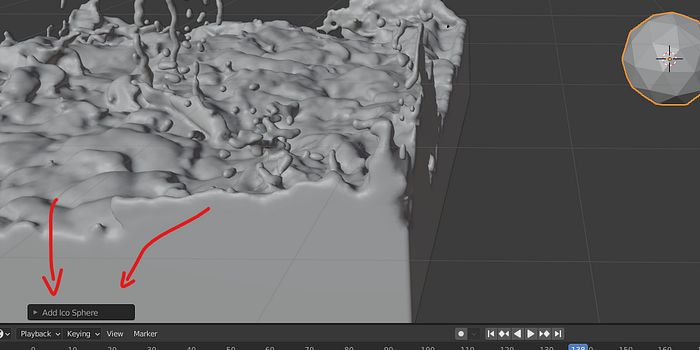
And click here to change some settings of the ico sphere
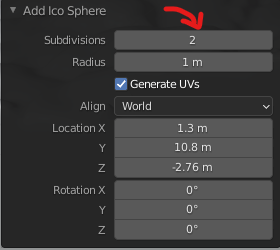
Change ‘Subdivisions’ to 1
Now go to ‘Shading’

Add a new material
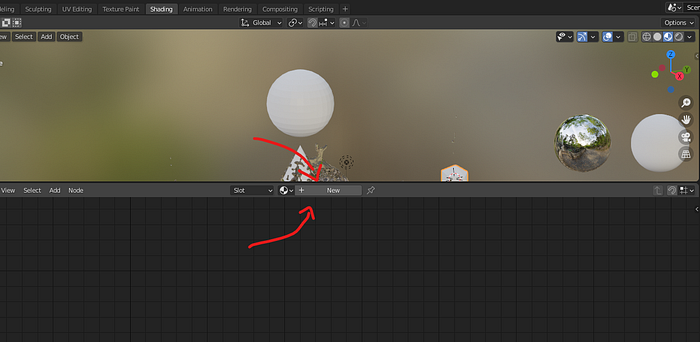
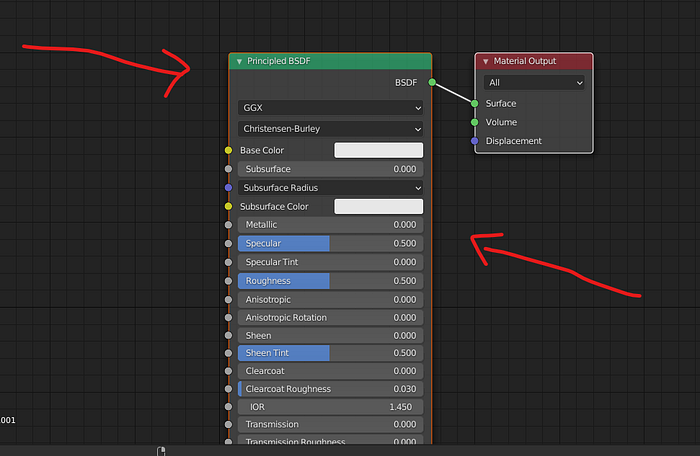
Delete ‘Principled BSDF’
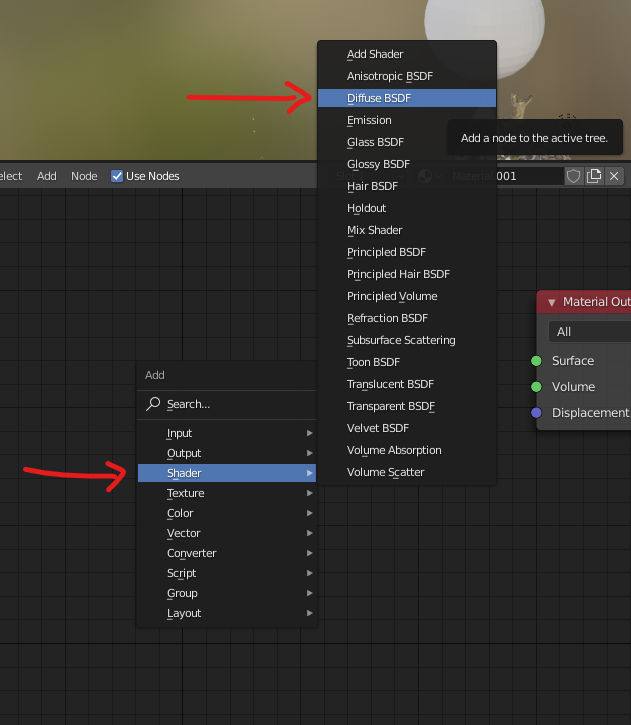
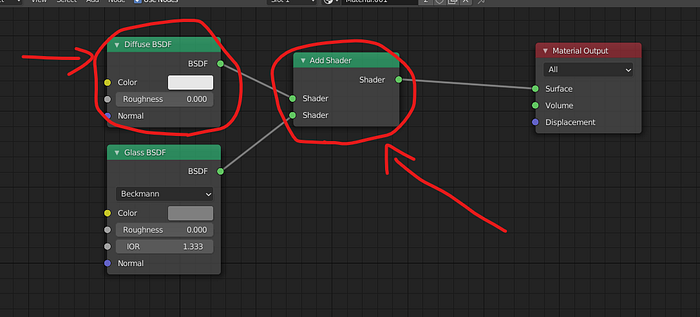
Using ‘Shift + a’ add Diffuse BSDF
Now add ‘Add Shader’
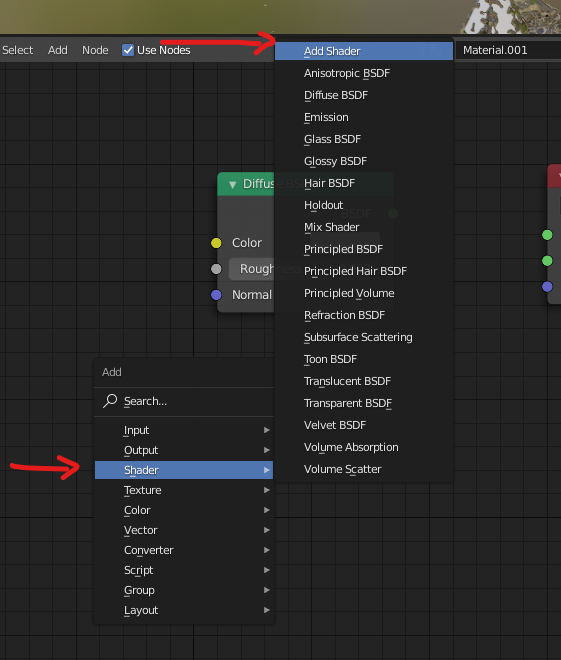
And add ‘Glass BSDF’, and change the IOR to 1.333
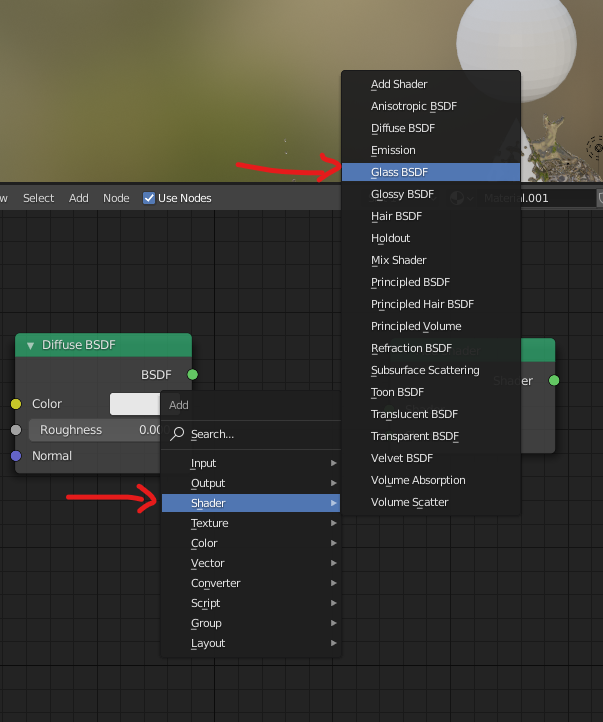
Now make this connection
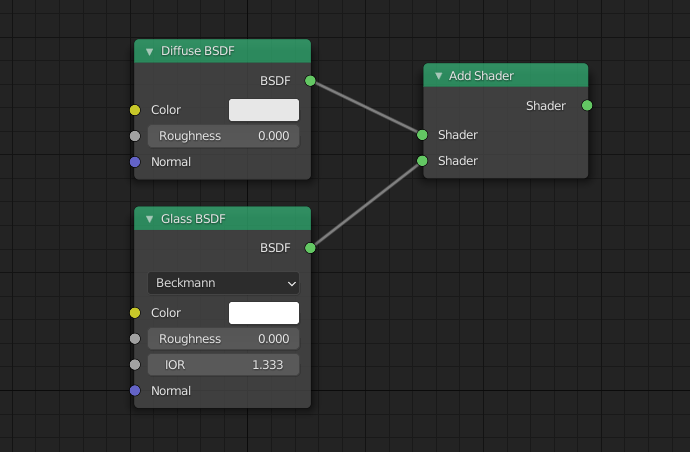
Click on the ‘Glass BSDF’ color and decrease the value to 0.5

Then connect ‘Add Shader’ to ‘Material Output’
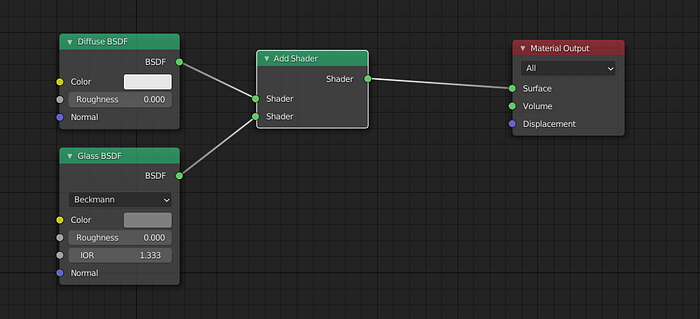
Now for the bubbles duplicate this ico sphere using ‘Shift + D’
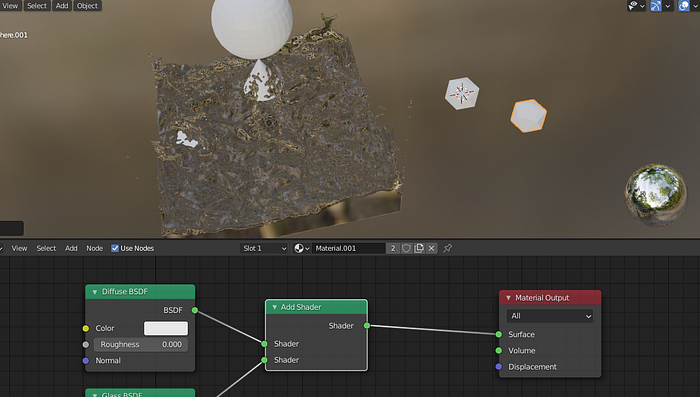
Click on the ‘2’ to duplicate the material

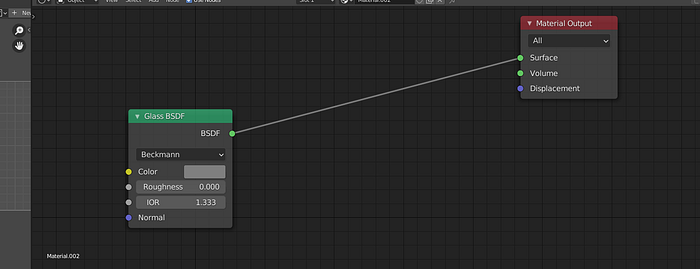
Now delete ‘Diffuse BSDF’ and ‘Add Shader’
And connect ‘Glass BSDF’ to ‘Material Output’
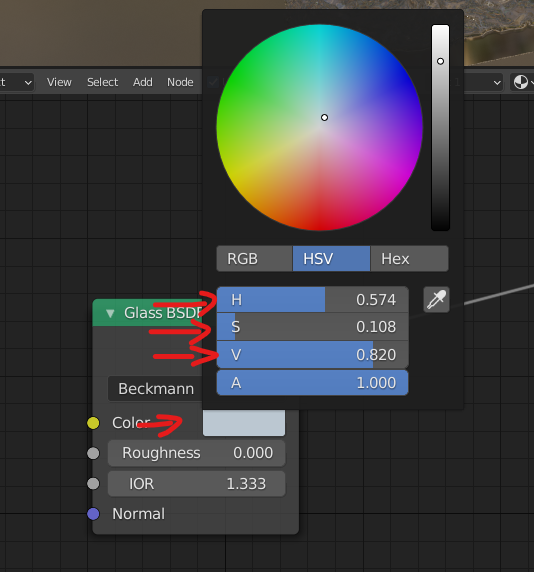
Change the glass value color to 0.82, saturation ‘S’, to 0.108 and hue ‘H’ to 0.574
Now select the fluid (domain) and go to the ‘Particle Properties’ section
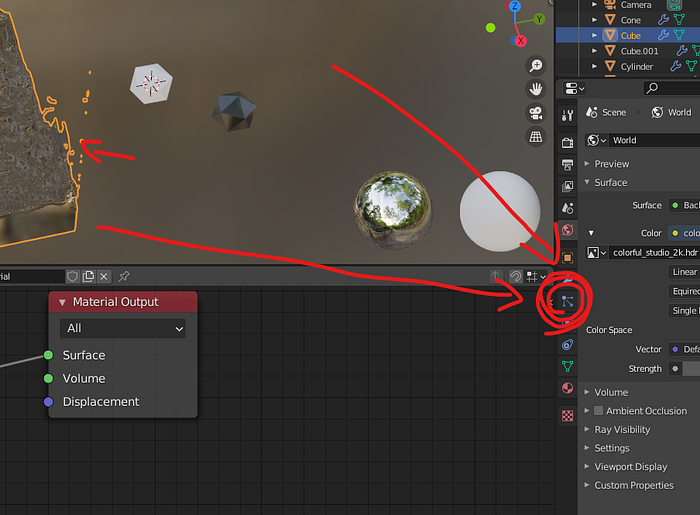
I recommend that you disable particle preview in the preview window so as not to slow down your computer
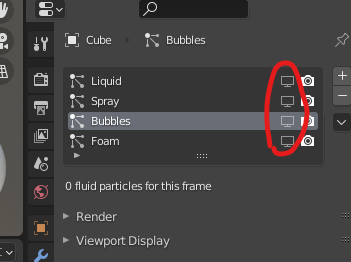
Render bubbles as a object
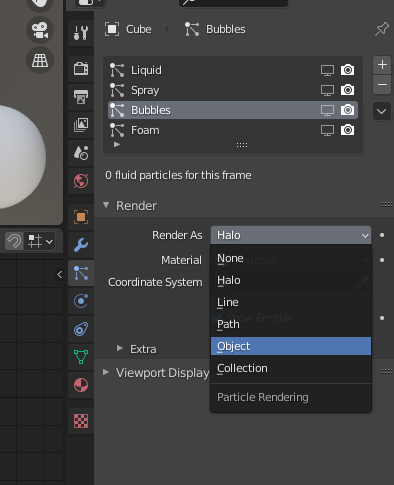
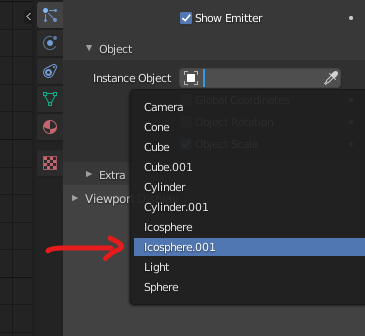
And select the ‘Instance Object’ to be the ‘Icosphere.001’
Now to remove the pattern of the particles go back to the ‘Layout’ tab

duplicate (Shift + d) your first icosphere and change the scale of the copy

Go to edit mode (press Tab) and move (press G) the particle a little bit to get out of the orange origin point
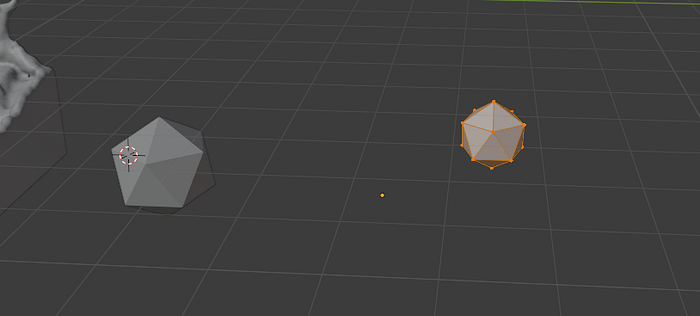
Go back to ‘Object Mode’ (press Tab again) and scale the particle a little on the ‘Z’ axis
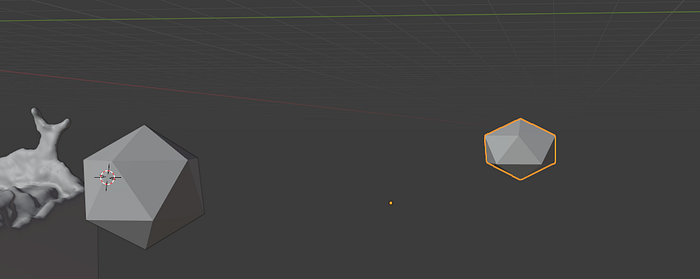
Duplicate this particle and change a little on the ‘Z’ axis of the new
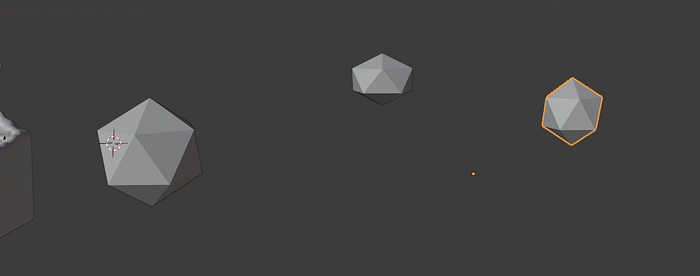
Select the 3 particles and press ‘Ctrl + g’ to create a new collection with the name ‘Splash’
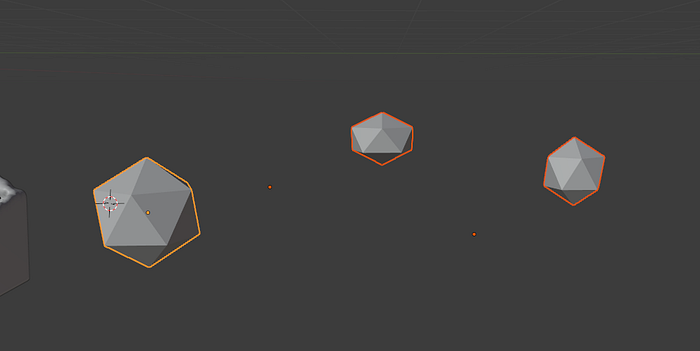
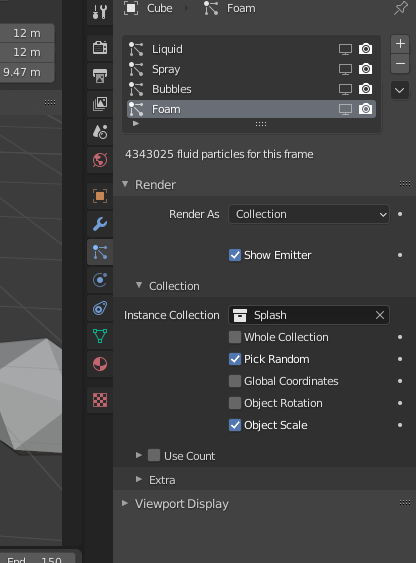
Now select your fluid and in the properties of the particles click on ‘Spray’ and render as ‘Collection’ and change the ‘Instance Connection’ to Splash

And enable ‘Pick Random’
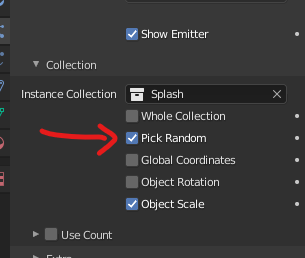
And do the same with the ‘Foam’ particles
Now, back to ‘Shading’ and select some of the icosphere from the ‘Splash’ collection’

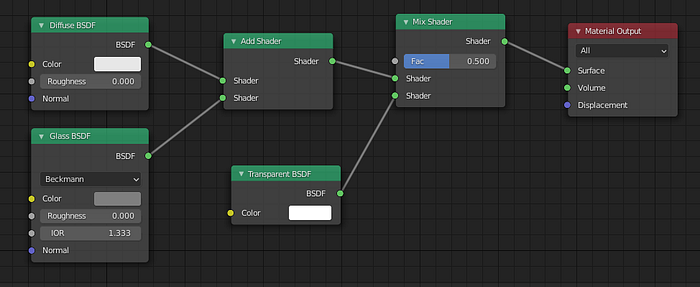
Add a ‘Mix Shader’
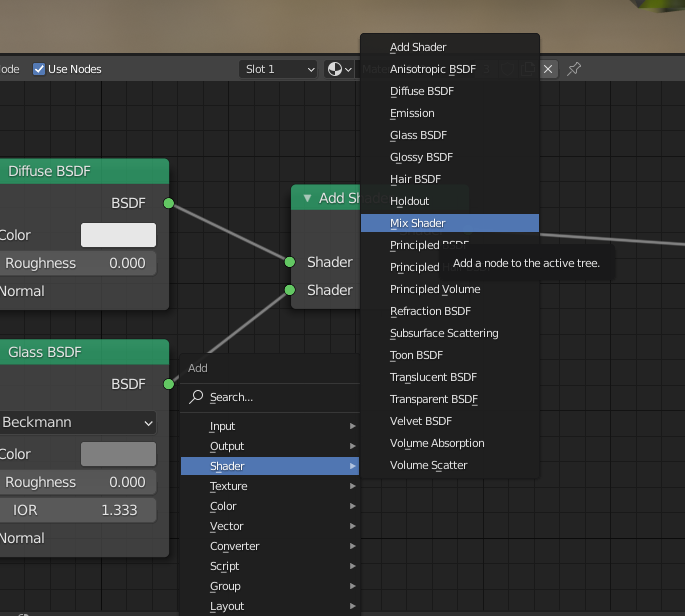
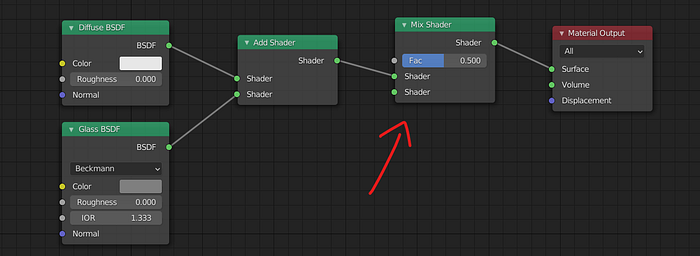
Make this connection
Then add a ‘Transparent BSDF’ shader
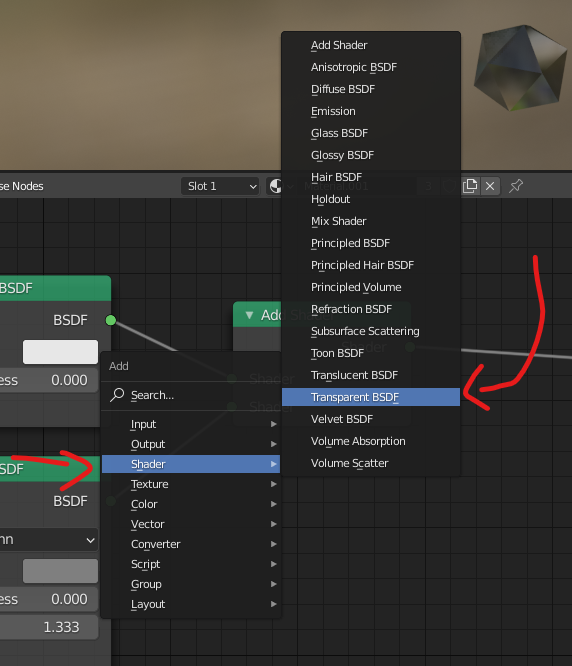
Make this connection
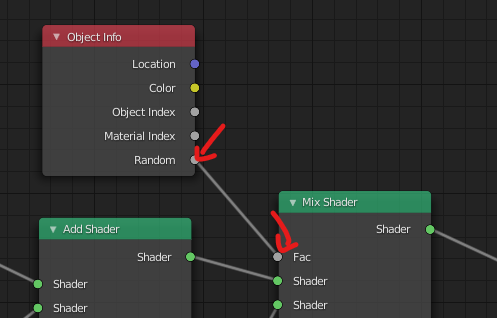
And then add ‘Object Info’ from ‘Input’

Connect ‘Random’ to ‘Factor’
And done!
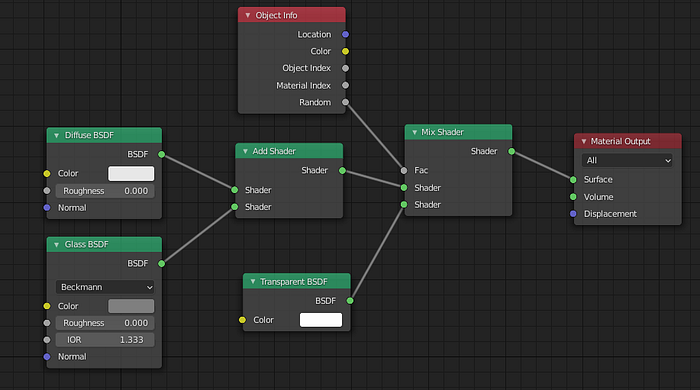
This will give the particles random opacity
Now back to ‘Layout’

And select the camera
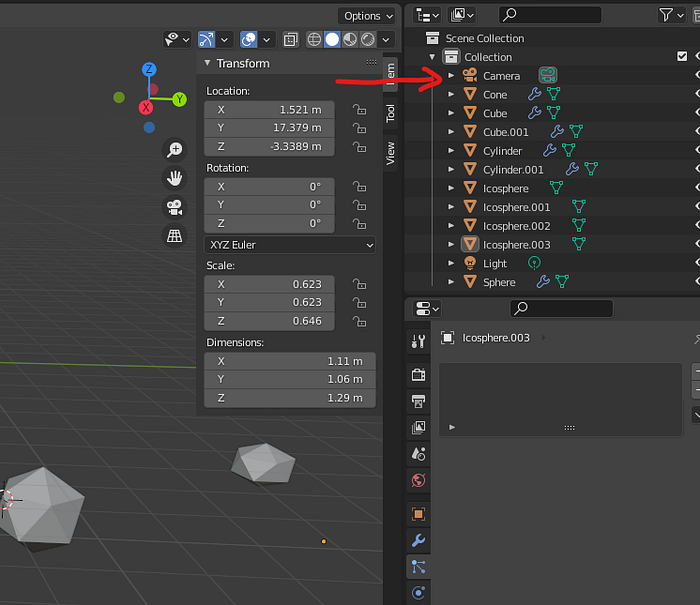
Go to camera properties
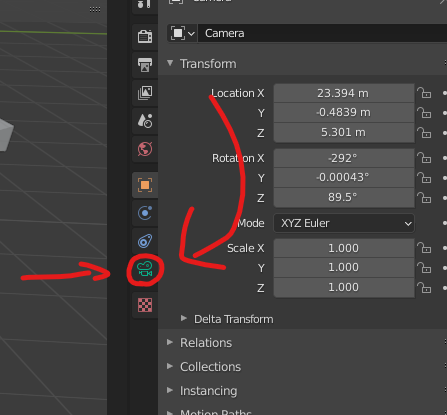
Enable ‘Depth of Field’
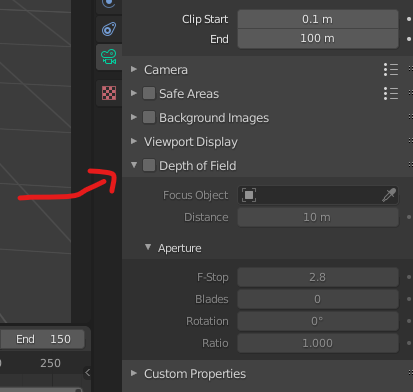
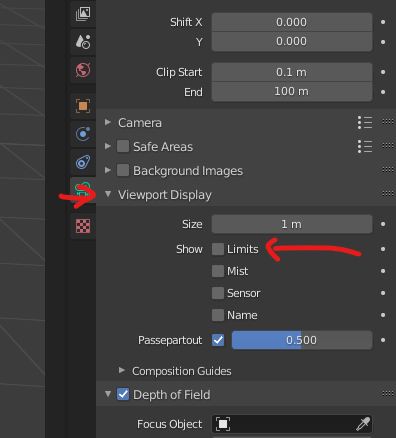
In ‘Viewport Display’ select ‘Limits’, to see the camera focus
To adjust the camera position, press Numpad 0, and press N, then go to ‘View’ tab
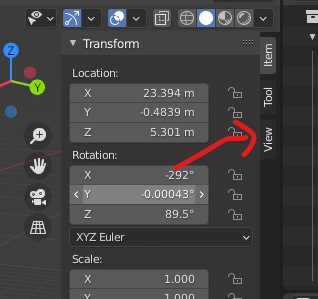
And enable ‘Camera to View’
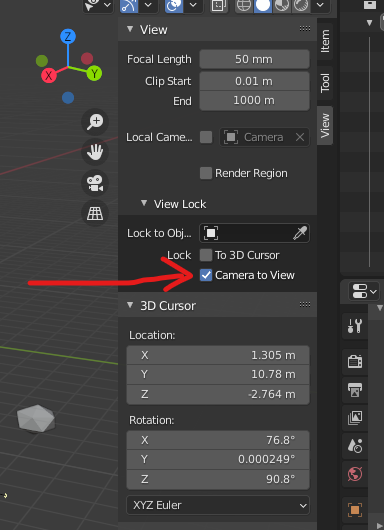
Now you can move the camera as your ‘Viewport’

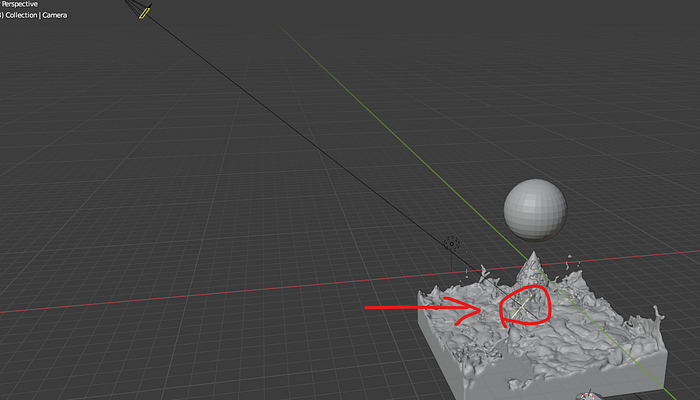
After choosing a good angle, adjust the camera’s focus by moving this
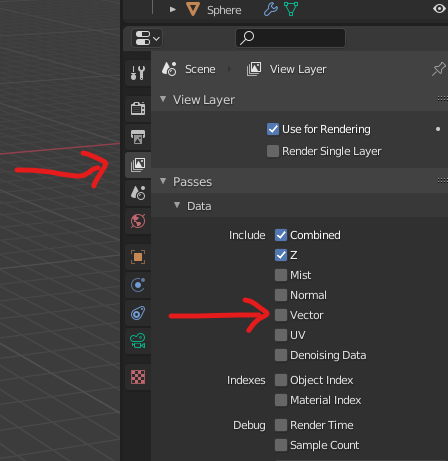
Now go to ‘View Layer Properties’ and enable ‘Vector’ to enable fluid motion blur
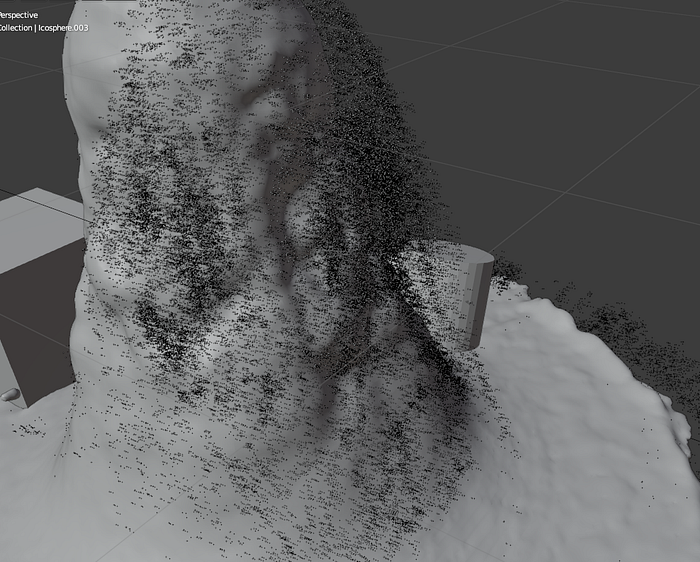
Now enable the particles again, and if you see the particles a bit large, select your collection and size the icosphere collection

This is a good size for real water
Now render your simulation
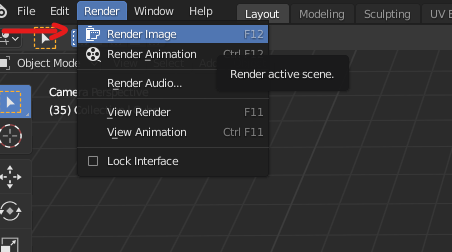
Once you're done, go to the 'Composition' tab to make rendering better

Enable ‘Une Nodes’
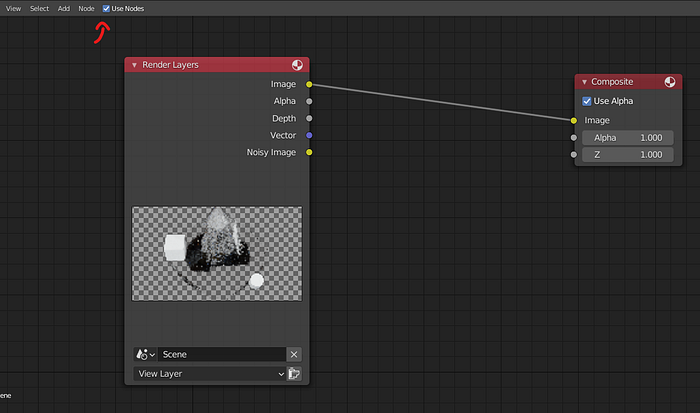
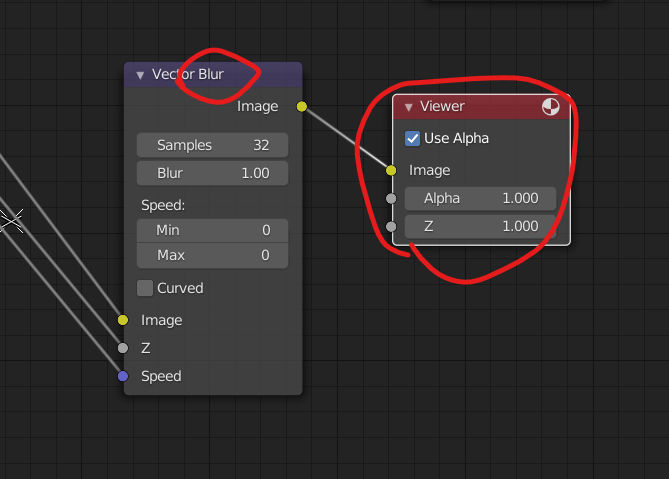
Now add ‘Vector Blur’
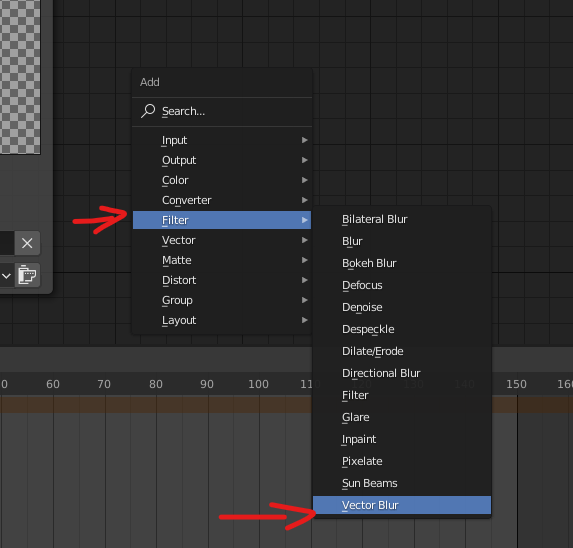
Make this connection
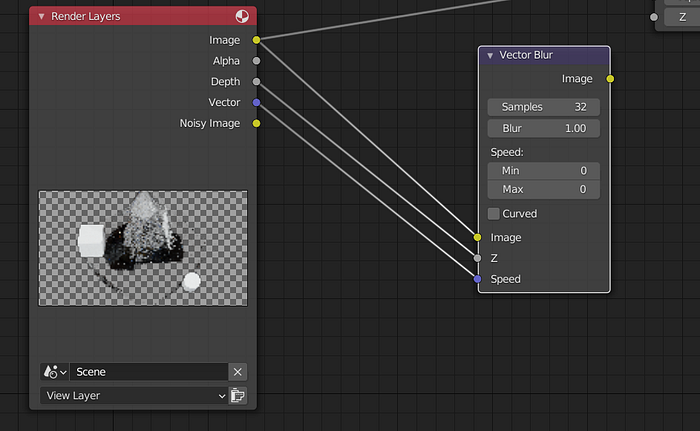
Now click on 'Vector Blur' by pressing 'Ctrl + Shift', and this appears and you will see your background image
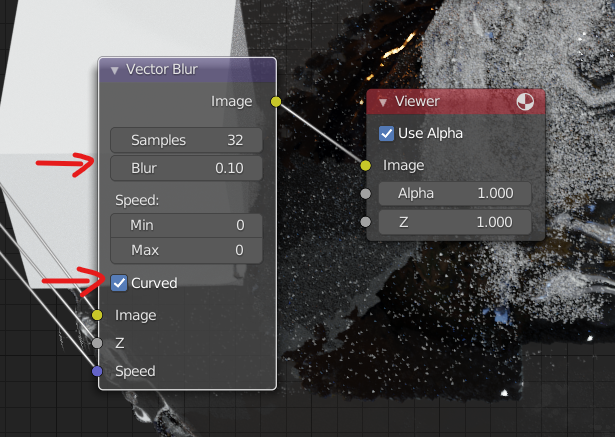
Change the blur to 0.10 and enable ‘Curved’
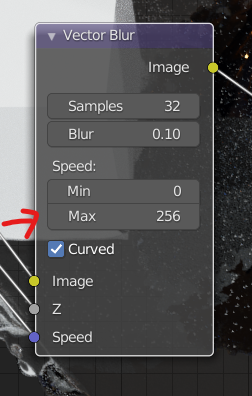
Now change the max speed to 256
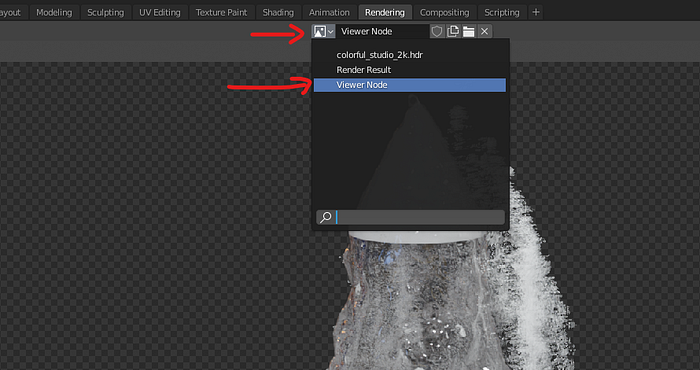
Now if you go to ‘Rendering’ you can export this image
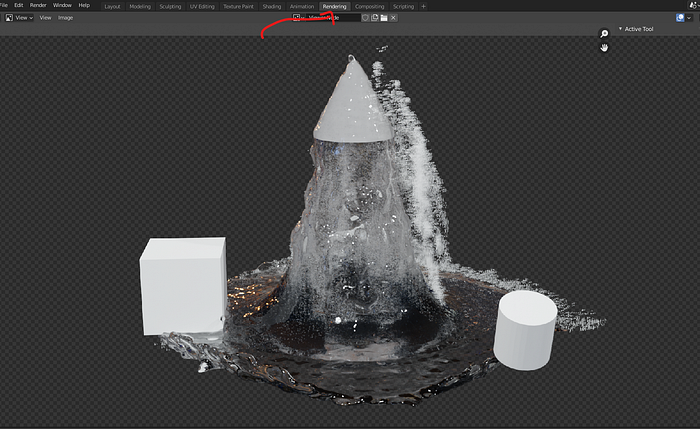
Switch to ‘Viewer Node’ if you want to render with motion blur
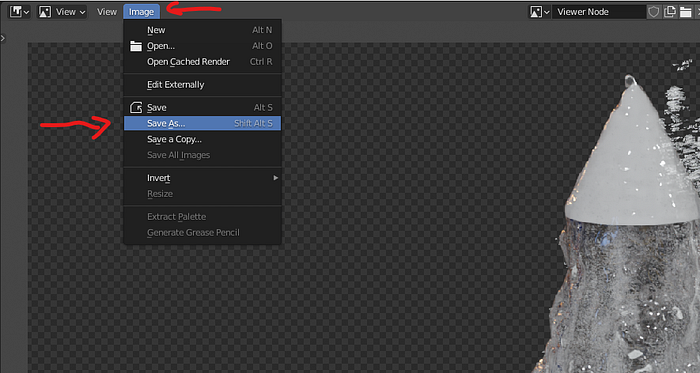
Now go to 'Image' and 'Save as ...' to save the image
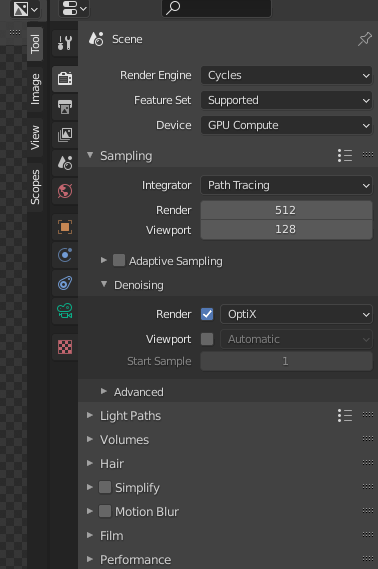
If you have a ‘super’ computer you can render the animation

But use this setting, or a better one for better results
And that was my result!!

I think there was a lot of information just in this article, but now you can do your super fluid simulation using Blender!! Thanks!
Reference: https://youtu.be/JYc_6fXEjw4


